Adding a Planogram to the Document
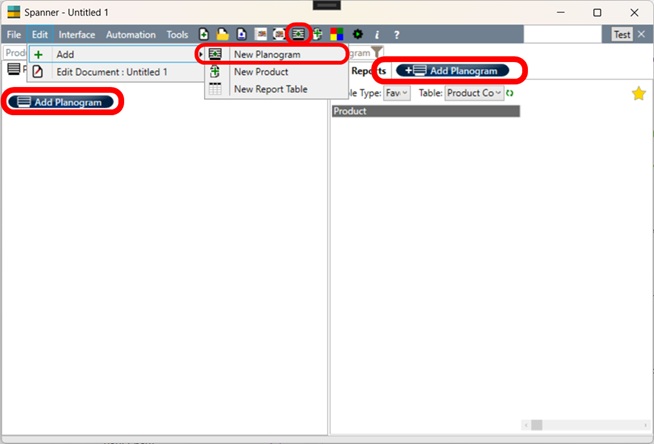
The four key ways by which you can add a new planogram to a document is shown by the image on the right.
1] Via the main menu at the top of the screen: Edit > Add > New Planogram.
2] Via the 'Add Planogram' button on the Planograms tab in the navigator (left panel).
3] Using the add planogram icon ( ) on the menu bar.
4] When there are no other planograms present in the document, another 'Add Planogram' button is available to the right of the tabs in the main work area.
Additionally a planogram can be added to a document via copy and paste from another document. Right click on the planogram in the planograms tab on the navigator on the source document, and copy the planogram. Navigate to the desination document, and from the main menu select Edit > Paste.
Also planograms can be imported from existing documents via the main menu and File > Import Planograms
The four key ways by which you can add a new planogram to a document is shown by the image on the right.
1] Via the main menu at the top of the screen: Edit > Add > New Planogram.
2] Via the 'Add Planogram' button on the Planograms tab in the navigator (left panel).
3] Using the add planogram icon (
) on the menu bar.4] When there are no other planograms present in the document, another 'Add Planogram' button is available to the right of the tabs in the main work area.
Additionally a planogram can be added to a document via copy and paste from another document. Right click on the planogram in the planograms tab on the navigator on the source document, and copy the planogram. Navigate to the desination document, and from the main menu select Edit > Paste.
Also planograms can be imported from existing documents via the main menu and File > Import Planograms
Ways to add a planogram to a document.
Adding a Bay to The Planogram
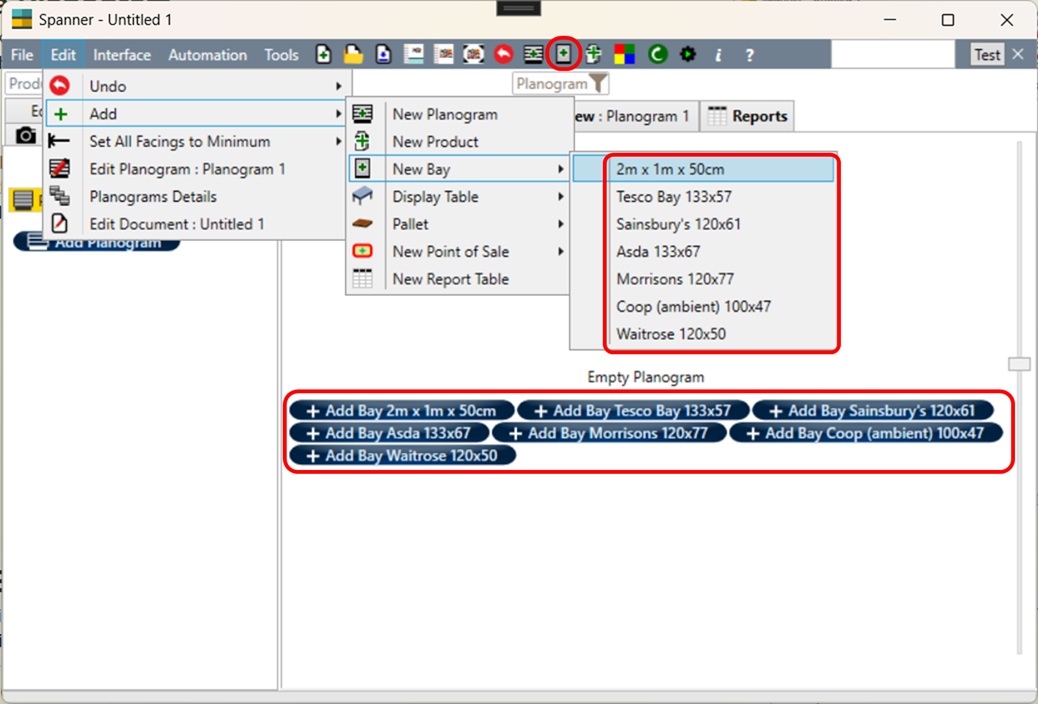
When a planogram is initially added it is blank, i.e. it contains no bays, fittings, points of sale or positions. Typically the first element that is added to a planogram is a bay. Fittings, such as shelves, hanging bars, and pegboards are then added to the bay. A bay can be added to the planogram in the following ways as shown by the image on the right.
1] Via the main menu: Edit > Add > Bay > Then select from preset bays.
2] Via the 'Add Bay' icon on the menu bar ( ).
).
3] When the planogram is empty, the main work area will show buttons to add any of the existing preset bays.
The preset bays are defined in the application settings.
Most fittings hang off a bay, however, a pallet or a display table can form a planogram without a bay. These can be added to the planogram via the Edit menu without a bay being present.
When a planogram is initially added it is blank, i.e. it contains no bays, fittings, points of sale or positions. Typically the first element that is added to a planogram is a bay. Fittings, such as shelves, hanging bars, and pegboards are then added to the bay. A bay can be added to the planogram in the following ways as shown by the image on the right.
1] Via the main menu: Edit > Add > Bay > Then select from preset bays.
2] Via the 'Add Bay' icon on the menu bar (
).3] When the planogram is empty, the main work area will show buttons to add any of the existing preset bays.
The preset bays are defined in the application settings.
Most fittings hang off a bay, however, a pallet or a display table can form a planogram without a bay. These can be added to the planogram via the Edit menu without a bay being present.
Ways to add a bay to a planogram.
Bay Properties
When a bay is selected in the main work area, the properties are shown below in the quick edit area. The user can adjust the key properties of the bay here. Alternatively, by double-clicking on the bay, the user can bring up the bay editor window.
When a bay is selected in the main work area, the properties are shown below in the quick edit area. The user can adjust the key properties of the bay here. Alternatively, by double-clicking on the bay, the user can bring up the bay editor window.

The bay properties in the quick edit panel.
Illustration of Bay Properties
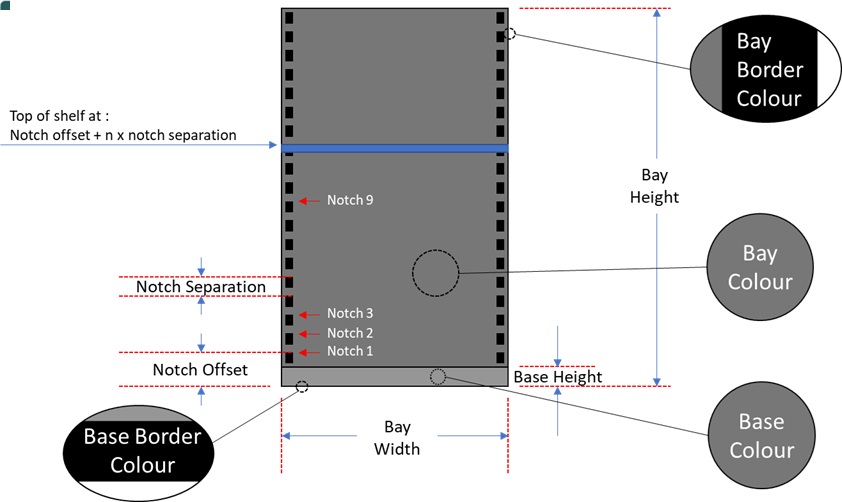
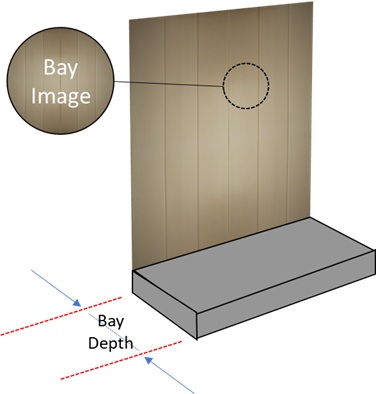
The key bay properties are illustrated in the adjacent images. The bay width will be a default width for shelves or other fittings added to the bay (unless otherwise specified in the fitting settings). The bay depth will be a defult depth for shelves added to the bay, but pegboards and hanging bars will have much smaller depths. The notches in the bay help position fittings added to the bay. By convention the top of the fitting aligns with the top of the notch. This convention helps define how to measure the notch offset. When a fitting exactly aligns in to notch 'holes' it will be assigned a notch number. By default notches are counted from the bottom of the fixture, but they can be counted from the top of the fixture. This is changed in the settings.
The key bay properties are illustrated in the adjacent images. The bay width will be a default width for shelves or other fittings added to the bay (unless otherwise specified in the fitting settings). The bay depth will be a defult depth for shelves added to the bay, but pegboards and hanging bars will have much smaller depths. The notches in the bay help position fittings added to the bay. By convention the top of the fitting aligns with the top of the notch. This convention helps define how to measure the notch offset. When a fitting exactly aligns in to notch 'holes' it will be assigned a notch number. By default notches are counted from the bottom of the fixture, but they can be counted from the top of the fixture. This is changed in the settings.
Bay properties.
Bay properties.
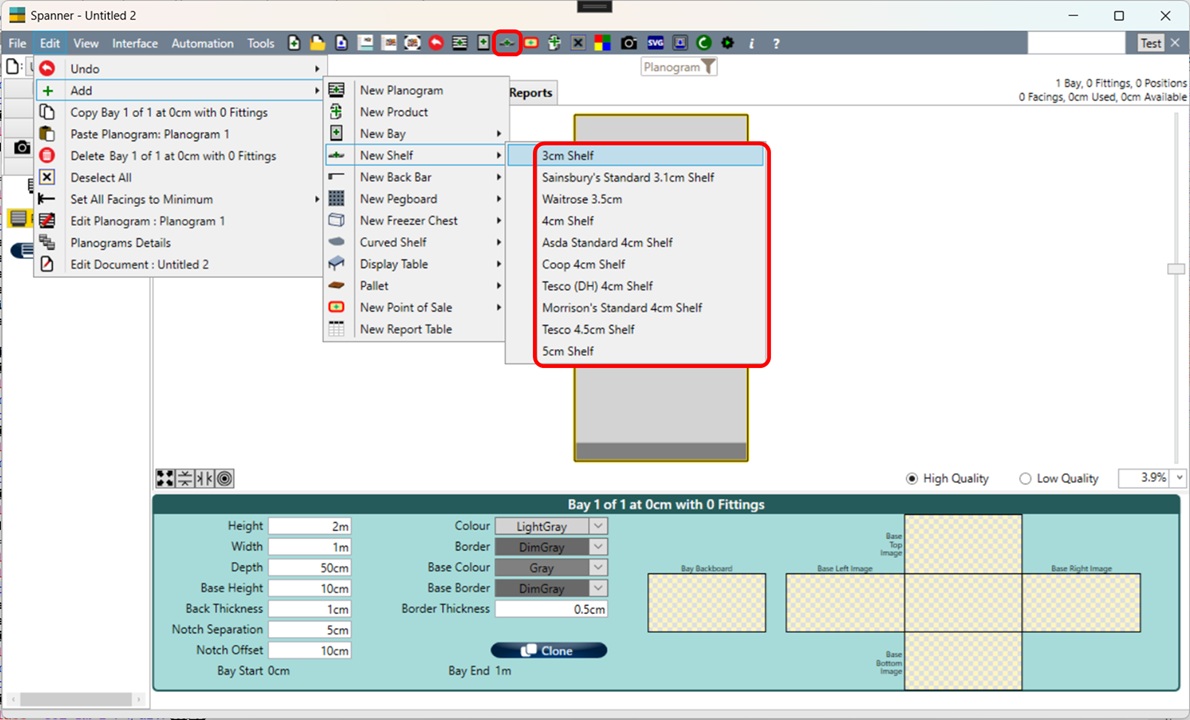
Adding Shelves
Shelves can be added to bays in the ways shown in the adjacent image.
1] Via the main menu : Edit > Add > New Shelf > Select One of the preset shelves.
2] Using the 'Add Shelf' icon ( ) on the menu bar.
Once a shelf has been added, the properties can be editted and the shelf can be replicated in the planogram through copy and paste functions.
Shelves can be added to bays in the ways shown in the adjacent image.
1] Via the main menu : Edit > Add > New Shelf > Select One of the preset shelves.
2] Using the 'Add Shelf' icon (
) on the menu bar.Once a shelf has been added, the properties can be editted and the shelf can be replicated in the planogram through copy and paste functions.
Adding a shelf to a bay via the edit menu or via the menu bar icon.
Shelf Properties
Shelves can have a number of properties which, like for bays, can be editted in the quick edit area or can be editted in the shelf editor through a double click on the shelf.
The physical dimensions of the Shelf are self explanatory. Note, however, that the height of the shelf referes to its physical vertical thickness. The position of the shelf is defined by the X and Y properties, with X referring to the distance from the far left of the fixture to the left of the shelf, and Y referring to the distance from the floor to the bottom of the shelf. Shelves can be moved via drag and drop or by editting the properties. Shelves can also be moved up or down a notch with the 'U' and 'D' keys.
Shelves can be pulled out of the fixture, to create 'floating shleves'. When a shelf has the same width as a bay and is positioned within a bay it will try and 'snap' to the nearest notch.

Properties of a selected shelf in the quick edit area.
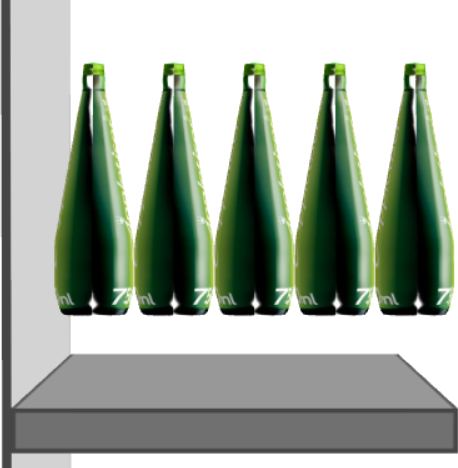
Additional Shelf Properties - Merchandising Height / Depth
For products that can stack on top each-other the shelf will partly define how far they can be stacked. Vertical facings on stackable products are added whilst the maximum merchandising height is not exceeded or there is not an obstruction above such as another shelf. This is most useful on the top shelf, as it would not be possible to let products stack indefinately. Note that some other factors will also affect the vertical stacking of products, such as the max stack of the product, or the max stack of the position. Note, in all circumstances a position much have at least one vertical facing.
Similarly there is maximum merchandising depth. If this is set to zero, then products will add rear facings until the back of the shelf is reached, or another obstruction is reached, or the maximum backwards of the position is reached. Otherwise if there is value set on the maximum merchadising depth then products will stack backwards whilst that is not exceeded (and other limiting factors are not applicable, e.g. max back or obstruction).
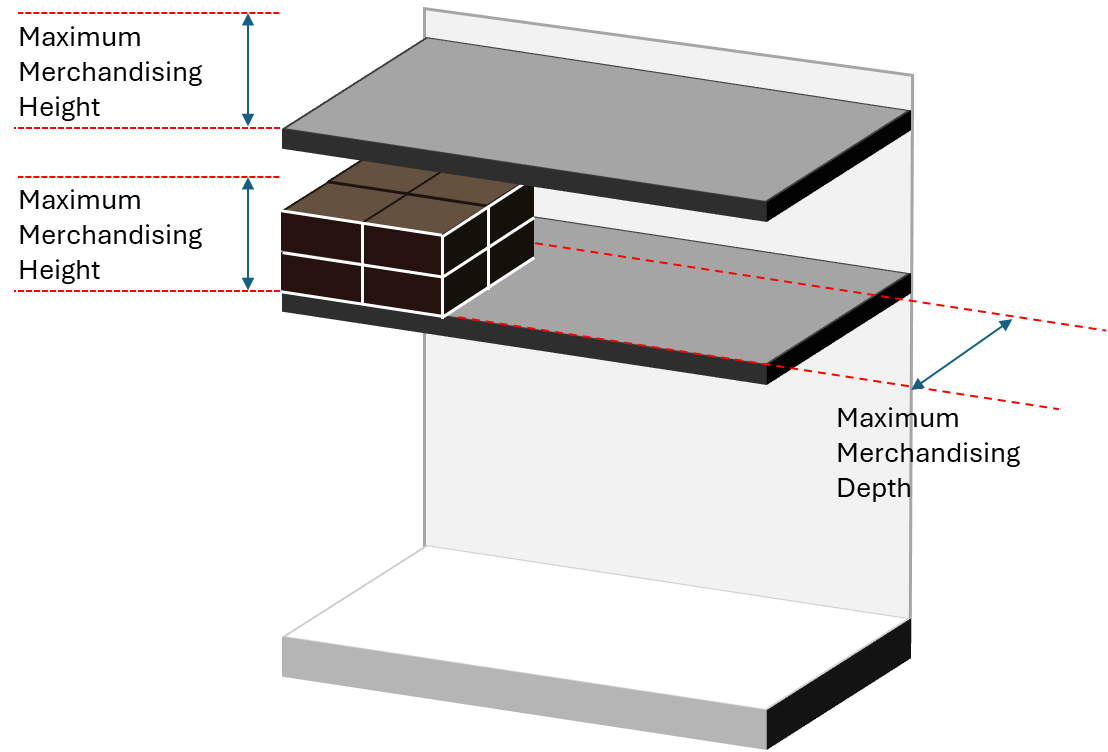
Maximum merchandising height and maximum merchandising depth.
Additional Shelf Properties - Flow
Typically when adding products to shelves, we want to be able to visually see how much space is left, and so typically the shelf flow is set to 'Left to Right'. However, when the shelf is full and the planogram is completed it is often more visually pleasing to set the shelf flow to 'Spread Even' or 'Facings'. 'Spread Even' flow will allocate any remaining available space evenly between positions and the edge of the shelf. 'Facings' flow will allocate any remaining available space evenly between each individual facing.
Typically when adding products to shelves, we want to be able to visually see how much space is left, and so typically the shelf flow is set to 'Left to Right'. However, when the shelf is full and the planogram is completed it is often more visually pleasing to set the shelf flow to 'Spread Even' or 'Facings'. 'Spread Even' flow will allocate any remaining available space evenly between positions and the edge of the shelf. 'Facings' flow will allocate any remaining available space evenly between each individual facing.
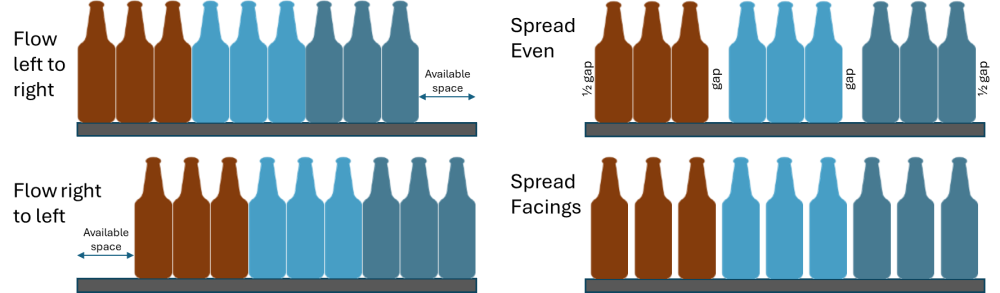
Merchandising Flow of Shelves.
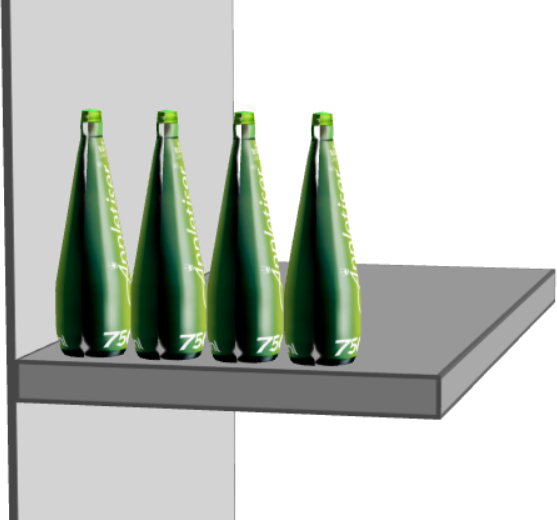
Additional Shelf Properties - Separations
Sometimes shelves have various merchadising equipment. Such as pushers, separators and dividers. This equipment is particularly prevalent in herbs and spices and vaping products. Where dividers or separators are used then we can set a minimum separation so that the position of each facing takes account of the divider between itself and the previous facing. A back separation can be set in a similar fashion. The divider, pusher and separator equipment sometimes also necessitates an edge separation.
Sometimes shelves have various merchadising equipment. Such as pushers, separators and dividers. This equipment is particularly prevalent in herbs and spices and vaping products. Where dividers or separators are used then we can set a minimum separation so that the position of each facing takes account of the divider between itself and the previous facing. A back separation can be set in a similar fashion. The divider, pusher and separator equipment sometimes also necessitates an edge separation.
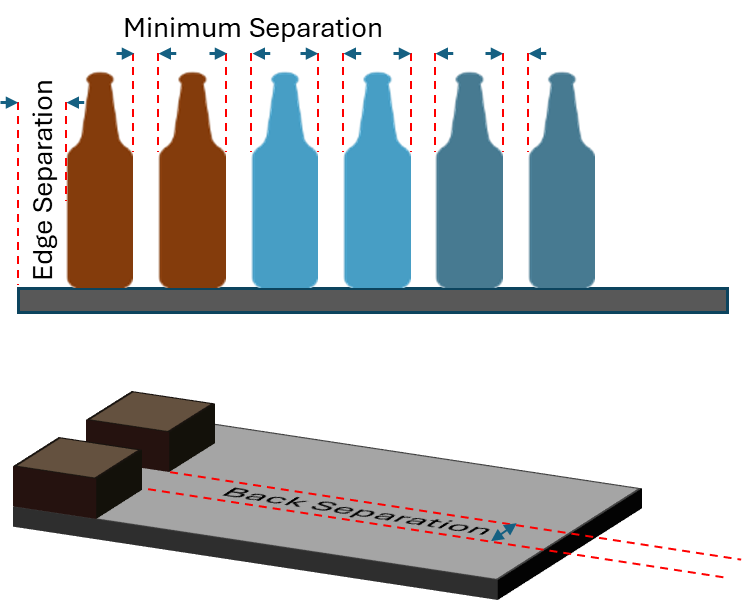
Separation of Facings.
Additional Shelf Properties - Angles
In most instances, shelves are level and perpendicular to the bay backboard. Occasionally shelves are displayed at an angle, usually sloping downwards. This can be replicated in Spanner using the slope property of the shelf. Shelves can slope down to 45° (or back to -45°). A positive angle is a downwards sloping shelf and a negative angle is an upward sloping shelf.
In most instances, products are displayed upright on the shelves. Occasionally they are merchadised at a slight angle. By default the merchadising angle of the shelf is set to 90°, but this can be editted.
Shelf Slope.
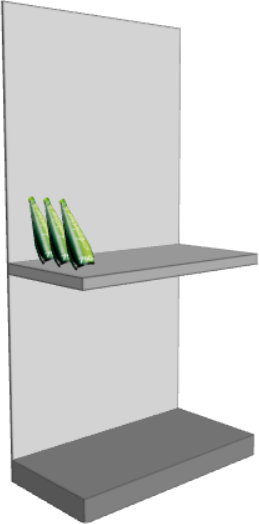
Shelf Merchandising Angle.
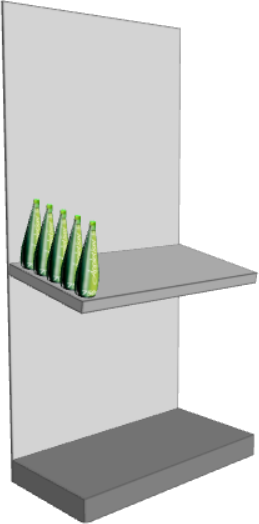
Additional Shelf Properties - Offsets
Usually products are placed on the shelf and the front facing is flush with the front of the shelf. Occasionally, there is a 'lip' on the shelf, or some other feature that means that the product must be placed back some distance from the front of the shelf. A Z Offset property allows for the product to begin merchadising from an offset position. A positive Z Offset will place the products on the shelf further back. A negative Z Offset will place the products further forward, overlapping the front of the shelf. This can be useful if there is a large tray dimension that might just overlap slightly.
Similarly, products can be offset in the Y direction with a Y Offset property. A positive Y Offset with place products above the shelf, and a negative Y Offset will plunge the products in to the shelf.
Z Offset of 10cm.
Y Offset of 10cm.
Editting Planogram
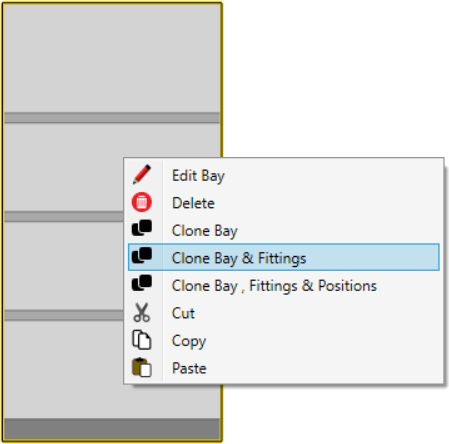
With shelves on a bay, the user may wish to replicate the bay and edit the shelf profile of the second bay. By this manner a multi-bay planogram can be produced. A bay can be cloned by right clicking on a bay and selecting 'Clone Bay & Fittings'. It is possible to only clone the bay, or to clone the bay, fittings and positions, but typically it is most useful to clone the bay and the fittings to produce the fixture structure of an additional bay. As before, the shelves can be adjusted in properties and positions to get the right shelf profile for the bay.
Bays can also be copied and pasted, both in and between planograms and documents.
If a bay needs to be moved to a different position in flow, then the bay is moved by the buttons in the quick edit area which will facilitate a bay movement, to the left or the right.
Cloning a bay.
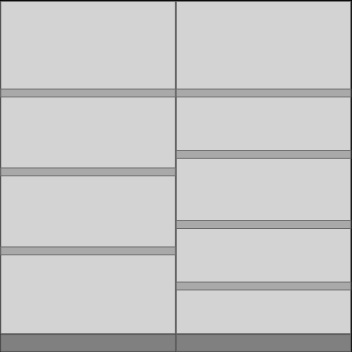
Multi-Bay Planogram.